|
Lathe Instructions
|
|||||
 |
|||||
INSTRUCTIONS TO LEARN HOW TO USE A LATHE
PAGE 1 OF 3
Check your Print Preview before printing this because
this webpage may look better if printed in Landscape format.
This information was originally compiled by the US Army.
Presented to you free by American Machine Tools Company.
Click to see an educational diagram of a typical metalworking lathe
The lathe is a machine tool used principally for shaping pieces of metal (and sometimes wood or other materials) by causing the workpiece to be held and rotated by the lathe while a tool bit is advanced into the work causing the cutting action. The basic lathe that was designed to cut cylindrical metal stock has been developed further to produce screw threads, tapered work, drilled holes, knurled surfaces, and crankshafts. Modern lathes offer a variety of rotating speeds and a means to manually and automatically move the cutting tool into the workpiece. Machinists and maintenance shop personnel must be thoroughly familiar with the lathe and its operations to accomplish the repair and fabrication of needed parts.
TYPES OF LATHES
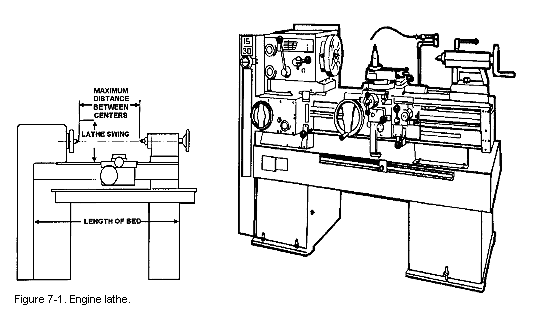
Lathes can be divided into three types for easy identification: engine lathe, turret lathe, and special purpose lathes. Some smaller ones are bench mounted and semi-portable. The larger lathes are floor mounted and may require special transportation if they must be moved. Field and maintenance shops generally use a lathe that can be adapted to many operations and that is not too large to be moved from one work site to another. The engine lathe (Figure 7-1) is ideally suited for this purpose. A trained operator can accomplish more machining jobs with the engine lathe than with any other machine tool. Turret lathes and special purpose lathes are usually used in production or job shops for mass production or specialized parts, while basic engine lathes are usually used for any type of lathe work. Further reference to lathes in this chapter will be about the various engine lathes.
ENGINE LATHES
Sizes
The size of an engine lathe is determined by the largest piece of stock that can be machined. Before machining a workpiece, the following measurements must be considered: the diameter of the work that will swing over the bed and the length between lathe centers (Figure 7-1).
Categories
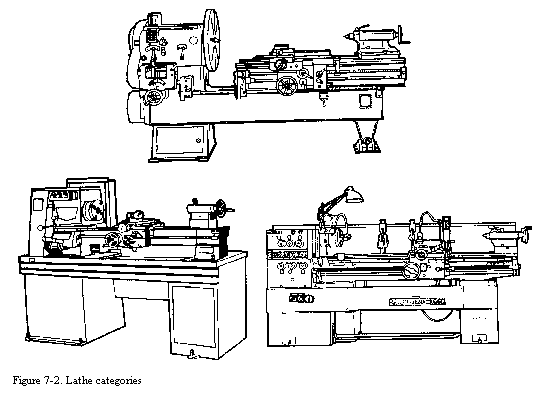
Slight differences in the various engine lathes make it easy to group them into three categories: lightweight bench engine lathes, precision tool room lathes, and gap lathes, which are also known as extension-type lathes. These lathe categories are shown in Figure 7-2 Different manufacturers may use different lathe categories.
Lightweight
Lightweight bench engine lathes are generally small lathes with a swing of 10 inches or less, mounted to a bench or table top. These lathes can accomplish most machining jobs, but may be limited due to the size of the material that can be turned.
Precision
Precision tool room lathes are also known as standard manufacturing lathes and are used for all lathe operations, such as turning, boring, drilling, reaming, producing screw threads, taper turning, knurling, and radius forming, and can be adapted for special milling operations with the appropriate fixture. This type of lathe can handle workpieces up to 25 inches in diameter and up to 200 inches long. However, the general size is about a 15-inch swing with 36 to 48 inches between centers. Many tool room lathes are used for special tool and die production due to the high accuracy of the machine.
GAP OR EXTENSION-TYPE LATHES
Gap or extension-type lathes are similar to toolroom lathes except that gap lathes can be adjusted to machine larger diameter and longer workpieces The operator can increase the swing by moving the bed a distance from the headstock, which is usually one or two feet. By sliding the bed away from the headstock, the gap lathe can be used to turn very long workpieces between centers.
LATHE COMPONENTS
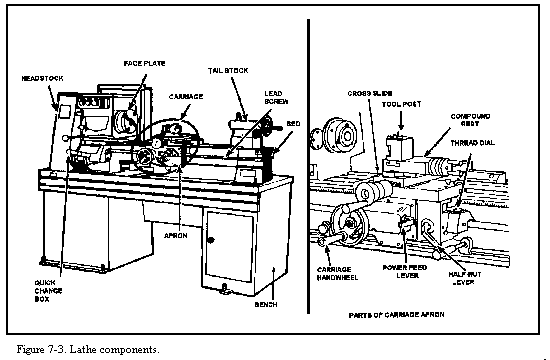
Engine lathes all have the same general functional parts, even though the specific location or shape of a certain part may differ from one manufacturer The bed is the foundation of the working parts of the lathe to another (Figure 7-3).
The main feature of its construction are the ways which are formed on its upper surface and run the full length of the bed.
Ways provide the means for holding the tailstock and carriage, which slide along the ways, in alignment with the permanently attached headstock
The headstock is located on the operator's left end of the lathe bed. It contains the main spindle and oil reservoir and the gearing mechanism for obtaining various spindle speeds and for transmitting power to the feeding and threading mechanism. The headstock mechanism is driven by an electric motor connected either to a belt or pulley system or to a geared system. The main spindle is mounted on bearings in the headstock and is hardened and specially ground to fit different lathe holding devices. The spindle has a hole through its entire length to accommodate long workpieces. The hole in the nose of the spindle usually has a standard Morse taper which varies with the size of the lathe. Centers, collets, drill chucks, tapered shank drills and reamers may be inserted into the spindle. Chucks, drive plates, and faceplates may be screwed onto the spindle or clamped onto the spindle nose.
The tailstock is located on the opposite end of the lathe from the headstock. It supports one end of the work when machining between centers, supports long pieces held in the chuck, and holds various forms of cutting tools, such as drills, reamers, and taps. The tailstock is mounted on the ways and is designed to be clamped at any point along the ways. It has a sliding spindle that is operated by a hand wheel and clamped in position by means of a spindle clamp. The tailstock may be adjusted laterally (toward or away from the operator) by adjusting screws. It should be unclamped from the ways before any lateral adjustments are made, as this will allow the tailstock to be moved freely and prevent damage to the lateral adjustment screws.
The carriage includes the apron, saddle, compound rest, cross slide, tool post, and the cutting tool. It sits across the lathe ways and in front of the lathe bed. The function of the carriage is to carry and move the cutting tool. It can be moved by hand or by power and can be clamped into position with a locking nut. The saddle carries the cross slide and the compound rest. The cross slide is mounted on the dovetail ways on the top of the saddle and is moved back and forth at 90° to the axis of the lathe by the cross slide lead screw. The lead screw can be hand or power activated. A feed reversing lever, located on the carriage or headstock, can be used to cause the carriage and the cross slide to reverse the direction of travel. The compound rest is mounted on the cross slide and can be swiveled and clamped at any angle in a horizontal plane. The compound rest is used extensively in cutting steep tapers and angles for lathe centers. The cutting tool and tool holder are secured in the tool post which is mounted directly to the compound rest. The apron contains the gears and feed clutches which transmit motion from the feed rod or lead screw to the carriage and cross slide.
CARE AND MAINTENANCE OF LATHES
Lathes are highly accurate machine tools designed to operate around the clock if properly operated and maintained. Lathes must be lubricated and checked for adjustment before operation. Improper lubrication or loose nuts and bolts can cause excessive wear and dangerous operating conditions.
The lathe ways are precision ground surfaces and must not be used as tables for other tools and should be kept clean of grit and dirt. The lead screw and gears should be checked frequently for any metal chips that could be lodged in the gearing mechanisms. Check each lathe prior to operation for any missing parts or broken shear pins. Refer to the operator's instructions before attempting to lift any lathe. Newly installed lathes or lathes that are transported in mobile vehicles should be properly leveled before any operation to prevent vibration and wobble. Any lathes that are transported out of a normal shop environment should be protected from dust, excessive heat, and very cold conditions. Change the lubricant frequently if working in dusty conditions. In hot working areas, use care to avoid overheating the motor or damaging any seals. Operate the lathe at slower speeds than normal when working in cold environments.
SAFETY
All lathe operators must be constantly aware of the safety hazards that are associated with using the lathe and must know all safety precautions to avoid accidents and injuries. Carelessness and ignorance are two great menaces to personal safety. Other hazards can be mechanically related to working with the lathe, such as proper machine maintenance and setup. Some important safety precautions to follow when using lathes are:
-
Correct dress is important, remove rings and watches, roll sleeves above elbows.
-
Always stop the lathe before making adjustments.
-
Do not change spindle speeds until the lathe comes to a complete stop.
-
Handle sharp cutters, centers, and drills with care.
-
Remove chuck keys and wrenches before operating
-
Always wear protective eye protection.
-
Handle heavy chucks with care and protect the lathe ways with a block of wood when installing a chuck.
-
Know where the emergency stop is before operating the lathe.
-
Use pliers or a brush to remove chips and swarf, never your hands.
-
Never lean on the lathe.
-
Never lay tools directly on the lathe ways. If a separate table is not available, use a wide board with a cleat on each side to lay on the ways.
-
Keep tools overhang as short as possible.
-
Never attempt to measure work while it is turning.
-
Never file lathe work unless the file has a handle.
-
File left-handed if possible.
-
Protect the lathe ways when grinding or filing.
-
Use two hands when sanding the workpiece. Do not wrap sand paper or emory cloth around the workpiece.
TOOLS AND EQUIPMENT
GENERAL PURPOSE CUTTING TOOLS
The lathe cutting tool or tool bit must be made of the correct material and ground to the correct angles to machine a workpiece efficiently. The most common tool bit is the general all-purpose bit made of high-speed steel. These tool bits are generally inexpensive, easy to grind on a bench or pedestal grinder, take lots of abuse and wear, and are strong enough for all-around repair and fabrication. High-speed steel tool bits can handle the high heat that is generated during cutting and are not changed after cooling. These tool bits are used for turning, facing, boring and other lathe operations. Tool bits made from special materials such as carbides, ceramics, diamonds, cast alloys are able to machine workpieces at very high speeds but are brittle and expensive for normal lathe work. High-speed steel tool bits are available in many shapes and sizes to accommodate any lathe operation.
SINGLE POINT TOOL BITS
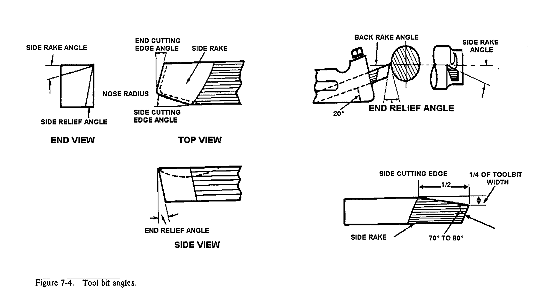
Single point tool bits can be one end of a high-speed steel tool bit or one edge of a carbide or ceramic cutting tool or insert. Basically, a single point cutter bit is a tool that has only one cutting action proceeding at a time. A machinist or machine operator should know the various terms applied to the single point tool bit to properly identify and grind different tool bits (Figure 7-4).
-
The shank is the main body of the tool bit.
-
The nose is the part of the tool bit which is shaped to a point and forms the corner between the side cutting edge and the end cutting edge. The nose radius is the rounded end of the tool bit.
-
The face is the top surface of the tool bit upon which the chips slide as they separate from the work piece.
-
The side or flank of the tool bit is the surface just below and adjacent to the cutting edge.
-
The cutting edge is the part of the tool bit that actually cuts into the workpiece, located behind the nose and adjacent to the side and face.
-
The base is the bottom surface of the tool bit, which usually is ground flat during tool bit manufacturing.
-
The end of the tool bit is the near-vertical surface which, with the side of the bit, forms the profile of the bit. The end is the trailing surface of the tool bit when cutting.
-
The heel is the portion of the tool bit base immediately below and supporting the face.
Angles of Tool Bits
The successful operation of the lathe and the quality of work that may be achieved depend largely on the angles that form the cutting edge of the tool bit (Figure 7-4). Most tools are hand ground to the desired shape on a bench or pedestal grinder. The cutting tool geometry for the rake and relief angles must be properly ground, but the overall shape of the tool bit is determined by the preference of the machinist or machine operator. Lathe tool bit shapes can be pointed, rounded, squared off, or irregular in shape and still cut quite well as long as the tool bit angles are properly ground for the type of material being machined. The angles are the side and back rake angles, the side and end cutting edge angles, and the side and end relief angles. Other angles to be considered are the radius on the end of the tool bit and the angle of the tool holder. After knowing how the angles affect the cutting action, some recommended cutting tool shapes can be considered.
Rake angle pertains to the top surface of the tool bit. There are two types of rake angles, the side and back rake angles (Figure 7-4). The rake angle can be positive, negative, or have no rake angle at all. The tool holder can have an angle, known as the tool holder angle, which averages about 15°, depending on the model of tool holder selected. The tool holder angle combines with the back rake angle to provide clearance for the heel of the tool bit from the workpiece and to facilitate chip removal. The side rake angle is measured back from the cutting edge and can be a positive rake angle or have no rake at all.
Rake angles cannot be too great or the cutting edge will lose strength to support the cutting action. The side rake angle determines the type and size of chip produced during the cutting action and the direction that the chip travels when leaving the cutting tool. Chip breakers can be included in the side rake angle to ensure that the chips break up and do not become a safety hazard.
Side and relief angles, or clearance angles, are the angles formed behind and beneath the cutting edge that provide clearance or relief to the cutting action of the tool. There are two types of relief angles, side relief and end relief. Side relief is the angle ground into the tool bit, under the side of the cutting edge, to provide clearance in the direction of tool bit travel. End relief is the angle ground into the tool bit to provide front clearance to keep the tool bit heel from rubbing. The end relief angle is supplemented by the tool holder angle and makes up the effective relief angle for the end of the tool bit.
Side and cutting edge angles are the angles formed by the cutting edge with the end of the tool bit (the end cutting edge angle), or with the side of the tool bit (the side cutting edge angle). The end cutting edge angle permits the nose of the tool bit to make contact with the work and aids in feeding the tool bit into the work. The side cutting edge angle reduces the pressure on the tool bit as it begins to cut. The side rake angle and the side relief angle combine to form the wedge angle (or lip angle) of the tool bit that provides for the cutting action (Figure 7-4).
A radius ground onto the nose of the tool bit can help strengthen the tool bit and provide for a smooth cutting action.
Shapes of Tool Bits
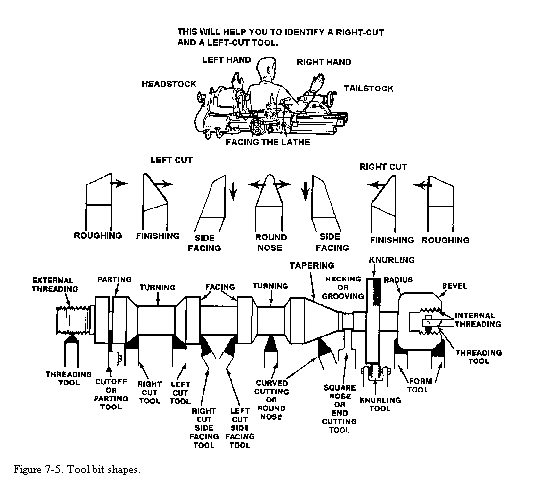
The overall shape of the lathe tool bits can be rounded, squared, or another shape as long as the proper angles are included. Tool bits are identified by the function they perform, such as turning or facing. They can also be identified as roughing tools or finishing tools. Generally, a roughing tool has a radius ground onto the nose of the tool bit that is smaller than the radius for a finishing or general-purpose tool bit. Experienced machinists have found the following shapes to be useful for different lathe operations.
A right-hand turning tool bit is shaped to be fed from right to left. The cutting edge is on the left side of the tool bit and the face slopes down away from the cutting edge. The left side and end of the tool bit are ground with sufficient clearance to permit the cutting edge to bear upon the workpiece without the heel rubbing on the work. The right-hand turning tool bit is ideal for taking light roughing cuts as well as general all-around machining.
A left-hand turning tool bit is the opposite of the right-hand turning tool bit, designed to cut when fed from left to right. This tool bit is used mainly for machining close in to a right shoulder.
The round-nose turning tool bit is very versatile and can be used to turn in either direction for roughing and finishing cuts. No side rake angle is ground into the top face when used to cut in either direction, but a small back rake angle may be needed for chip removal. The nose radius is usually ground in the shape of a half-circle with a diameter of about 1/32 inch.
The right-hand facing tool bit is intended for facing on right-hand side shoulders and the right end of a workpiece. The cutting edge is on the left-hand side of the bit, and the nose is ground very sharp for machining into a square corner. The direction of feed for this tool bit should be away from the center axis of the work, not going into the center axis.
A left-hand facing tool bit is the opposite of the right-hand facing tool bit and is intend to machine and face the left sides of shoulders.
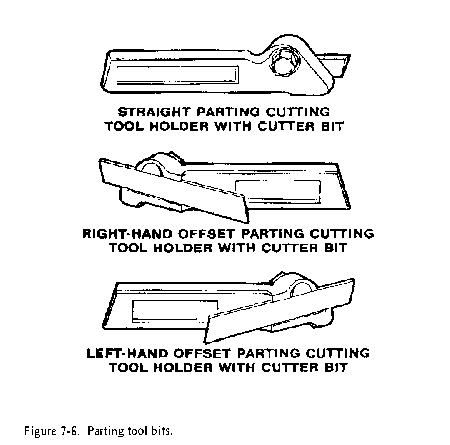
The parting tool bit, Figure 7-6, is also known as the cutoff tool bit. This tool bit has the principal cutting edge at the squared end of the bit that is advanced at a right angle into the workpiece. Both sides should have sufficient clearance to prevent binding and should be ground slightly narrower at the back than at the cutting edge. Besides being used for parting operations, this tool bit can be used to machine square corners and grooves.
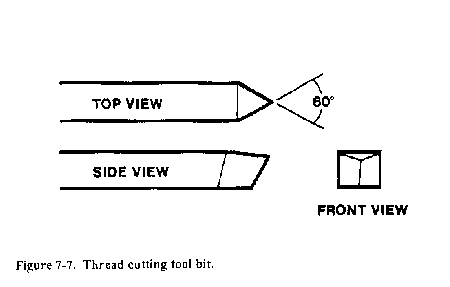
Thread-cutting tool bits, Figure 7-7, are ground to cut the type and style of threads desired. Side and front clearances must be ground, plus the special point shape for the type of thread desired. Thread-cutting tool bits can be ground for standard 60° thread forms or for square, Acme, or special threads. Thread-cutting forms are discussed in greater detail later in this chapter.
SPECIAL TYPES OF LATHE CUTTING TOOLS
Besides the common shaped tool bits, special lathe operations and heavy production work require special types of cutting tools. Some of the more common of these tools are listed below.
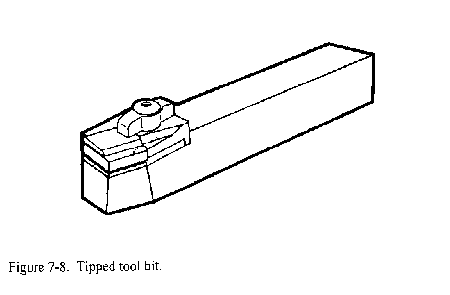
Tungsten carbide, tantalum carbide, titanium carbide, ceramic, oxide, and diamond-tipped tool bits (Figure 7-8). and cutting tool inserts are commonly used in high-speed production work when heavy cuts are necessary and where exceptionally hard and tough materials are encountered. Standard shapes for tipped tool bits are similar to high-speed steel-cutting tool shapes. Carbide and ceramic inserts can be square, triangular, round, or other shapes. The inserts are designed to be indexed or rotated as each cutting edge gets dull and then discarded. Cutting tool inserts are not intended for reuse after sharpening.
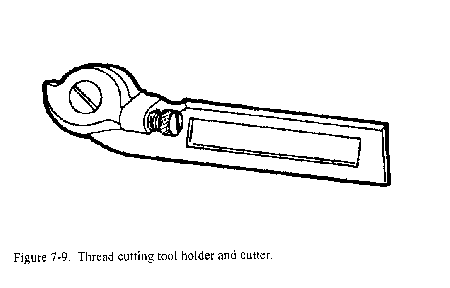
Specially formed thread cutter mounted in a thread cutter holder (Figure 7-9). This tool is designed for production high-speed thread cutting operations. The special design of the cutter allows for sharp and strong cutting edges which need only to be resharpened occasionally by grinding the face. The cutter mounts into a special tool holder that mounts to the lathe tool post.
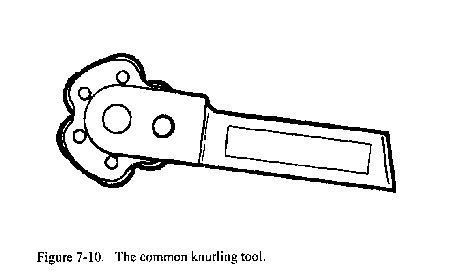
The common knurling tool, Figure 7-10, consists of two cylindrical cutters, called knurls, which rotate in a specially designed tool holder. The knurls contain teeth which are rolled against the surface of the workpiece to form depressed patterns on the workpiece. The common knurling tool accepts different pairs of knurls, each having a different pattern or pitch. The diamond pattern is most widely used and comes in three pitches: 14, 21, or 33. These pitches produce coarse, medium, and fine knurled patterns.
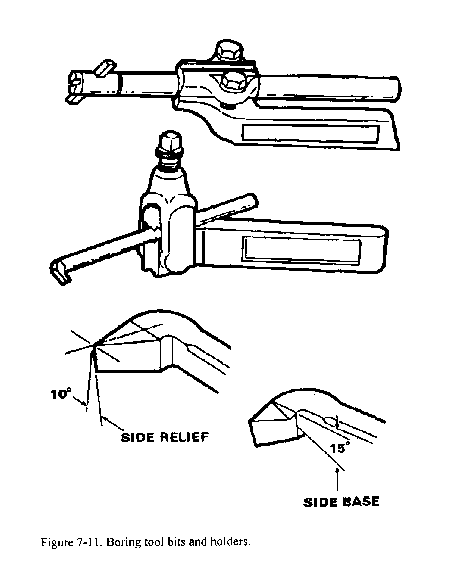
Boring tool bits, Figure 7-11, are ground similar to left-hand turning tool bits and thread-cutting tool bits, but with more end clearance angle to prevent the heel of the tool bit from rubbing against the surface of the bored hole. The boring tool bit is usually clamped to a boring tool holder, but it can be a one-piece unit . The boring tool bit and tool holder clamp into the lathe tool post.
There is no set procedure to grinding lathe tool bit angles and shapes, but there are general guidelines that should be followed. Do not attempt to use the bench or pedestal grinder without becoming fully educated as to its safety, operation, and capabilities. In order to effectively grind a tool bit, the grinding wheel must have a true and clean face and be of the appropriate material for the cutting tool to be ground. Carbide tool bits must be ground on a silicon carbide grinding wheel to remove the very hard metal.
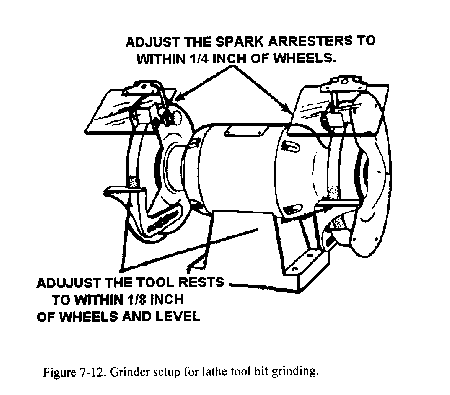
High-speed steel tool bits are the only tool bits that can effectively be ground on the bench or pedestal grinder when equipped with the aluminum oxide grinding wheel which is standard for most field and maintenance shops. Before grinding, shaping, or sharpening a high-speed steel tool bit, inspect the entire grinder for a safe setup and adjust the tool rests and guards as needed for tool bit grinding (Figure 7-12).
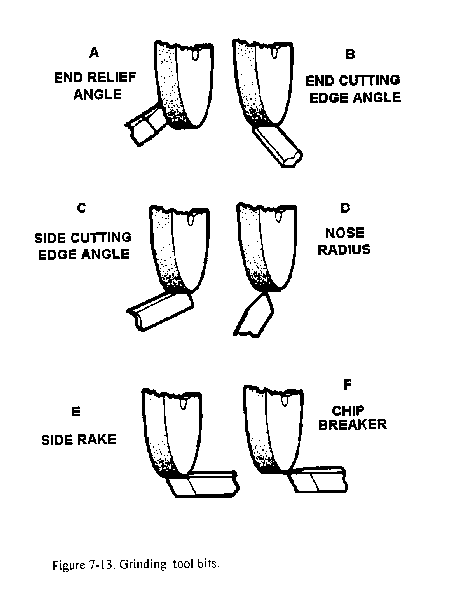
Set the tool rest 1/8 inch or less from the wheel, and adjust the spark arrestor 1/4 inch or less. Each grinder is usually equipped with a coarse-grained wheel for rough grinding and a fine-grained wheel for fine and finish grinding. Dress the face of the grinding wheels as needed to keep a smooth, flat grinding surface for the tool bit. When grinding the side and back rake angles, ensure the grinding wheel has a sharp corner for shaping the angle. Dip the tool bit in water occasionally while grinding to keep the tool bit cool enough to handle and to avoid changing the property of the metal by overheating. Frequently inspect the tool bit angles with a protractor or special grinding gage. Grind the tool bit to the recommended angles in the reference for tool bit geometry (Machinist Table 7-l ). After grinding to the finished shape, the tool bit should be honed lightly on an oilstone to remove any burrs or irregular high spots. The smoother the finish on the cutting tool, the smoother the finish on the work. Figure 7-13 shows the steps involved in grinding a round nose tool bit to be used for turning in either direction. As a safety note, never use the side of the grinding wheel to grind a tool bit, as this could weaken the bonding of the wheel and cause it to crack and explode.
TOOL HOLDERS AND TOOL POSTS
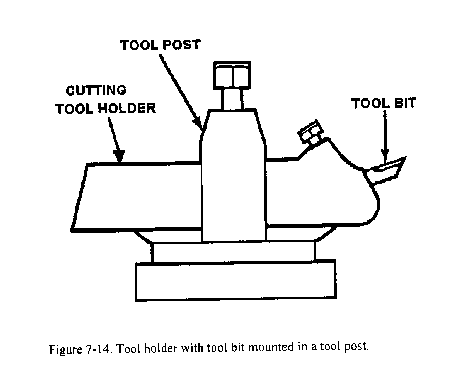
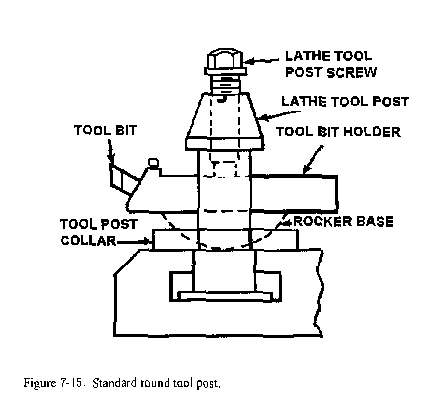
Lathe tool holders are designed to securely and rigidly hold the tool bit at a fixed angle for properly machining a workpiece (Figure 7-14). Tool holders are designed to work in conjunction with various lathe tool posts, onto which the tool holders are mounted. Tool holders for high speed steel tool bits come in various types for different uses. These tool holders are designed to be used with the standard round tool post that usually is supplied with each engine lathe (Figure 7-15 ). This tool post consists of the post, screw, washer, collar, and rocker, and fits into the T-slot of the compound rest.
Standard tool holders for high-speed steel cutting tools have a square slot made to fit a standard size tool bit shank. Tool bit shanks can be 1/4-inch, 5/16-inch, 3/8-inch, and greater, with all the various sizes being manufactured for all the different lathe manufacturer's tool holder models. Some standard tool holders for steel tool bits are the straight tool holder, right and left offset tool holder, and the zero rake tool holder designed for special carbide tool bits. Other tool holders to fit the standard round tool post include straight, left, and right parting tool holders, knurling tool holders, boring bar tool holders, and specially formed thread cutting tool holders.
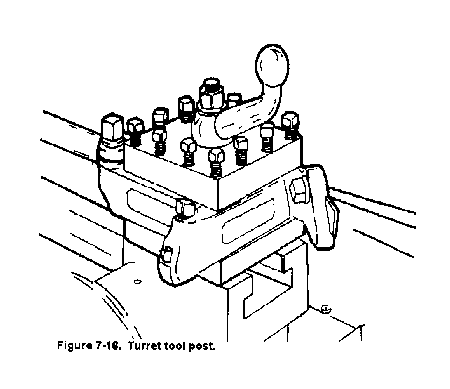
The turret tool post (Figure 7-16 ) is a swiveling block that can hold many different tool bits or tool holders. Each cutting tool can quickly be swiveled into cutting position and clamped into place using a quick clamping handle. The turret tool post is used mainly for high-speed production operations.
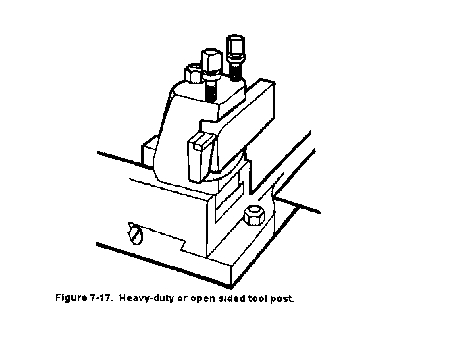
The heavy-duty or open-sided tool post (Figure 7-17) is used for holding a single carbide-tipped tool bit or tool holder. It is used mainly for very heavy cuts that require a rigid tool holder.
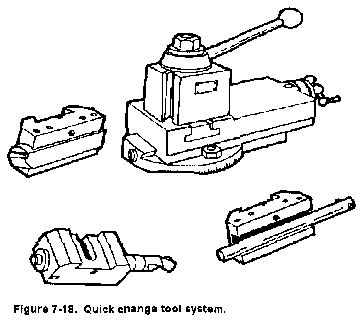
The quick-change tool system (Figure 7-18) consists of a quick-change dovetail tool post with a complete set of matching dovetailed tool holders that can be quickly changed as different lathe operations become necessary. This system has a quick-release knob on the top of the tool post that allows tool changes in less than 5 seconds, which makes this system valuable for production machine shops.
WORK HOLDING DEVICES
Many different devices, such as chucks, collets, faceplates, drive plates, mandrels, and lathe centers, are used to hold and drive the work while it is being machined on a lathe. The size and type of work to be machined and the particular operation that needs to be done will determine which work holding device is best for any particular job. Another consideration is how much accuracy is needed for a job, since some work holding devices are more accurate than others. Operational details for some of the more common work holding devices follow.
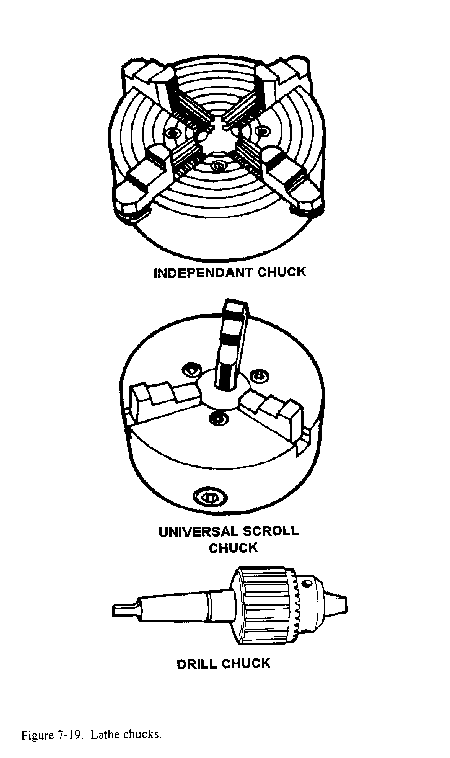
The universal scroll chuck, Figure 7-19, usually has three jaws which move in unison as an adjusting pinion is rotated. The advantage of the universal scroll chuck is its ease of operation in centering work for concentric turning. This chuck is not as accurate as the independent chuck, but when in good condition it will center work within 0.002 to 0.003 inches of runout.
The jaws are moved simultaneously within the chuck by a scroll or spiral-threaded plate. The jaws are threaded to the scroll and move an equal distance inward or outward as the scroll is rotated by the adjusting pinion. Since the jaws are individually aligned on the scroll, the jaws cannot usually be reversed. Some manufactures supply two sets of jaws, one for internal work and one for external work. Other manufactures make the jaws in two pieces so the outside, or gripping surface may be reversed. which can be interchanged.
The universal scroll chuck can be used to hold and automatically center round or hexagonal workpieces. Having only three jaws, the chuck cannot be used effectively to hold square, octagonal, or irregular shapes.
The independent chuck, Figure 7-19, generally has four jaws which are adjusted individually on the chuck face by means of adjusting screws. The chuck face is scribed with concentric circles which are used for rough alignment of the jaws when chucking round workpieces. The final adjustment is made by turning the workpiece slowly by hand and using a dial indicator to determine it's concentricity. The jaws are then readjusted as necessary to align the workpiece within the desired tolerances.
The jaws of the independent chuck may be used as illustrated or may be reversed so that the steps face in the opposite direction; thus workpieces can be gripped either externally or internally. The independent chuck can be used to hold square, round, octagonal, or irregularly shaped workpieces in either a concentric or eccentric position due to the independent operation of each jaw.
Because of its versatility and capacity for fine adjustment, the independent chuck is commonly used for mounting odd-shaped workpieces which must be held with extreme accuracy.
A combination chuck combines the features of the independent chuck and the universal scroll chuck and can have either three or four jaws. The jaws can be moved in unison on a scroll for automatic centering or can be moved individually if desired by separate adjusting screws.
The drill chuck, Figure 7-19, is a small universal chuck which can be used in either the headstock spindle or the tailstock for holding straight-shank drills, reamers, taps, or small diameter workpieces. The drill chuck has three or four hardened steel jaws which are moved together or apart by adjusting a tapered sleeve within which they are contained. The drill chuck is capable of centering tools and small-diameter workpieces to within 0.002 or 0.003 inch when firmly tightened.
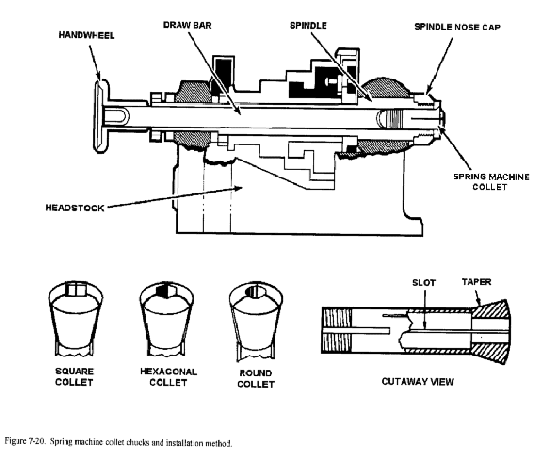
The collet chuck is the most accurate means of holding small workpieces in the lathe. The collet chuck consists of a spring machine collet (Figure 7-20) and a collet attachment which secures and regulates the collet on the headstock spindle of the lathe.
THE COLLET CHUCK IS THE MOST ACCURATE MEANS OF HOLDING SMALL WORKPIECES IN THE LATHE
The spring machine collet is a thin metal bushing with an accurately machined bore and a tapered exterior. The collet has three lengthwise slots to permit its sides being sprung slightly inward to grip the workpiece. To grip the workpiece accurately, the collet must be no more than 0.005 inch larger or smaller than the diameter of the piece to be chucked. For this reason, spring machine collets are available in increments of 1/64 inch. For general purposes, the spring machine collets are limited in capacity to 1 1/8 inch in diameter.
For general purposes, the spring machine collets are limited in capacity to 1 1/8 inch in diameter.
The collet attachment consists of a collet sleeve, a drawbar, and a handwheel or hand lever to move the drawbar. The spring machine collet and collet attachment together form the collet chuck. Figure 7-20 illustrates a typical collet chuck installation. The collet sleeve is fitted to the right end of the headstock spindle. The drawbar passes through the headstock spindle and is threaded to the spring machine collet. When the drawbar is rotated by means of the hand wheel, it draws the collet into the tapered adapter, causing the collet to tighten on the workpiece. Spring machine collets are available in different shapes to chuck square and hexagonal workpieces of small dimensions as well as round workpieces.
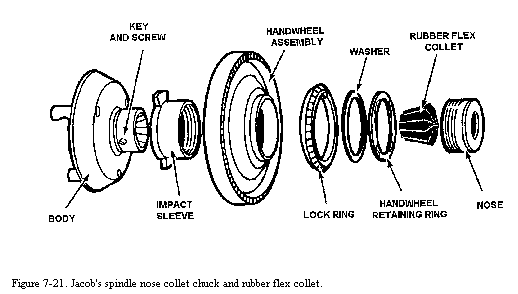
The Jacob's spindle-nose collet chuck (Figure 7-21) is a special chuck is used for the Jacob's rubber flex collets. This chuck combines the functions of the standard collet chuck and drawbar into one single compact unit. The chuck housing has a handwheel on the outer diameter that turns to tighten or loosen the tapered spindle which holds the rubber flex collets. Rubber flex collets are comprised of devices made of hardened steel jaws in a solid rubber housing. These collets have a range of 1/8 inch per collet. The gripping power and accuracy remain constant throughout the entire collet capacity. Jacob's rubber flex collets are designed for heavy duty turning and possess two to four times the grip of the conventional split steel collet. The different sets of these collets are stored in steel boxes designed for holding the collets. Collets are normally stored in steel boxes designed for holding the collets.
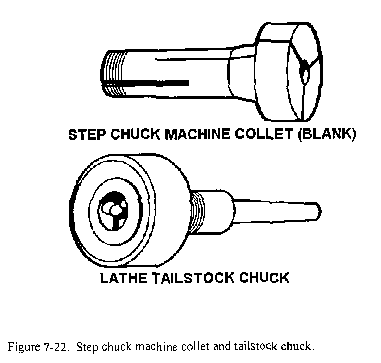
The step chuck, Figure 7-22, is a variation of the collet chuck, and it is intended for holding small round workpieces or discs for special machining jobs. Step chucks are blank when new, and then are machined in the lathe for an exact fit for the discs to be turned. The step chuck machine collet, which is split into three sections like the spring machine collet, is threaded to the drawbar of the collet attachment.
The lathe tailstock chuck, Figure 7-22, is a device designed to support the ends of workpieces in the tailstock when a lathe center cannot be used conveniently. The chuck has a taper arbor that fits into the lathe tailstock spindle. The three bronze self-centering jaws of the chuck will accurately close upon workpieces between 1/4 and 1 inch in diameter. The bronze jaws provide a good bearing surface for the workpiece. The jaws are adjusted to the diameter of the workpiece and then locked in place.
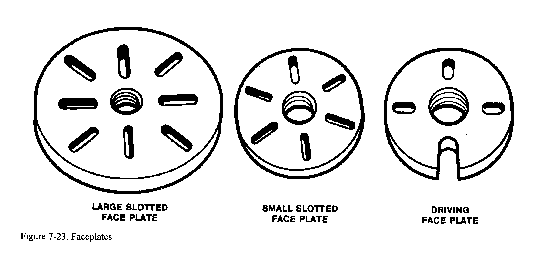
A lathe faceplate, Figure 7-23, is a flat, round plate that threads to the headstock spindle of the lathe. The faceplate is used for irregularly shaped workpieces that cannot be successfully held by chucks or mounted between centers. The workpiece is either attached to the faceplate using angle plates or brackets or bolted directly to the plate. Radial T-slots in the faceplate surface facilitate mounting workpieces. The faceplate is valuable for mounting workpieces in which an eccentric hole or projection is to be machined. The number of applications of the faceplates depends upon the ingenuity of the machinist. A small faceplate known as a driving faceplate is used to drive the lathe dog for workpieces mounted between centers. The driving faceplate usually has fewer T-slots than the larger faceplates. When the workpiece is supported between centers, a lathe dog is fastened to the workpiece and engaged in a slot of the driving faceplate.
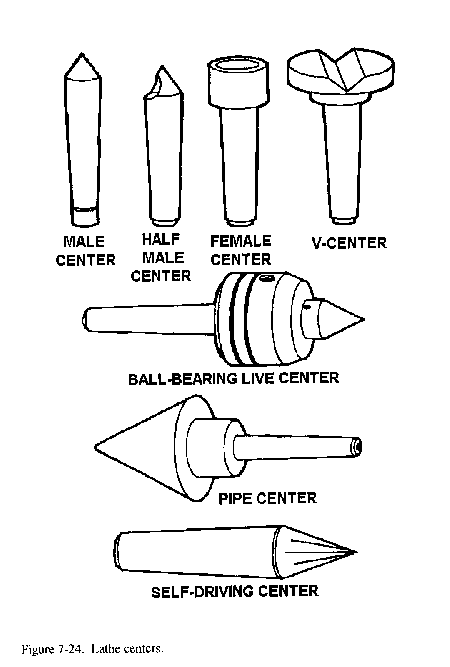
Lathe centers, are the most common devices for supporting workpieces in the lathe. Most lathe centers have a tapered point with a 60° included angle to fit workpiece holes with the same angle. The workpiece is supported between two centers, one in the headstock spindle and one in the tailstock spindle. Centers for lathe work have standard tapered shanks that fit directly into the tailstock and into the headstock spindle using a center sleeve to convert the larger bore of the spindle to the smaller tapered size of the lathe center. The centers are referred to as live centers or dead centers. A live center revolves with the work and does not need to be lubricated and hardened. A dead center does not revolve with the work and must be hardened and heavily lubricated when holding work. Live and dead centers commonly come in matched sets, with the hardened dead center marked with a groove near the conical end point.
The ball bearing live center is a special center mounted in a ball bearing housing that lets the center turn with the work and eliminates the need for a heavily lubricated dead center. Ball bearing types of centers can have interchangeable points which make this center a versatile tool in all lathe operations. Modern centers of this type can be very accurate. Descriptions for some common lathe centers follow.
The male center or plain center is used in pairs for most general lathe turning operations. The point is ground to a 60° cone angle. When used in the headstock spindle where it revolves with the workpiece, it is commonly called a live center. When used in the tailstock spindle where it remains stationary when the workpiece is turned, it is called a dead center. Dead centers are always made of hardened steel and must be lubricated very often to prevent overheating.
The half male center is a male center that has a portion of the 60° cone cut away. The half male center is used as a dead center in the tailstock where facing is to be performed. The cutaway portion of the center faces the cutting tool and provides the necessary clearance for the tool when facing the surface immediately around the drilled center in the workpiece.
The V-center is used to support round workpieces at right angles to the lathe axis for special operations such as drilling or reaming. The pipe center is similar to the male center but its cone is ground to a greater angle and is larger in size. It is used for holding pipe and tubing in the lathe. The female center is conically bored at the tip and is used to support workpieces that are pointed on the end. A self-driving lathe center is a center with serrated ground sides that can grip the work while turning between centers without having to use lathe dogs.
A self driving center is a center that has grips installed on the outer edge of the center diameter that can be forced into the work to hold and drive the work when turning between centers without using lathe dogs.
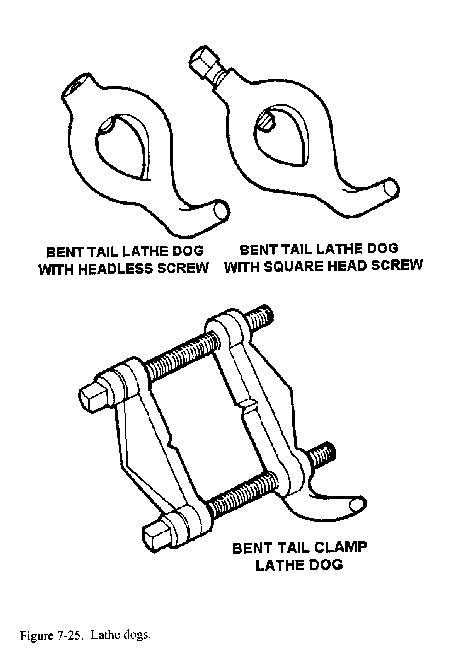
Lathe dogs are cast metal devices used to provide a firm connection between the headstock spindle and the workpiece mounted between centers. This firm connection permits the workpiece to be driven at the same speed as the spindle under the strain of cutting. Three common lathe dogs are illustrated in Figure 7-25. Lathe dogs may have bent tails or straight tails. When bent-tail dogs are used, the tail fits into a slot of the driving faceplate. When straight-tail dogs are used, the tail bears against a stud projecting from the faceplate. The bent-tail lathe dog with headless setscrew is considered safer than the dog with the square head screw because the headless setscrew reduces the danger of the dog catching in the operator's clothing and causing an accident. The bent-tail clamp lathe dog is used primarily for rectangular workpieces.
MANDRELS
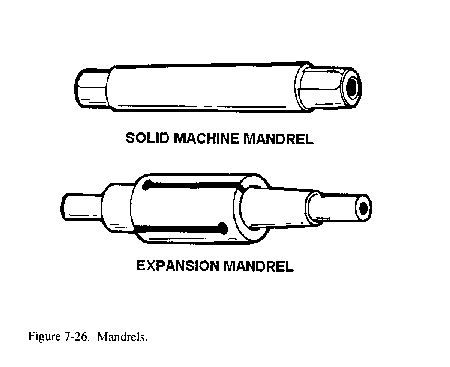
A workpiece which cannot be held between centers because its axis has been drilled or bored, and which is not suitable for holding in a chuck or against a faceplate, is usually machined on a mandrel. A mandrel is a tapered axle pressed into the bore of the workpiece to support it between centers.
A mandrel should not be confused with an arbor, which is a similar device but used for holding tools rather than workpieces. To prevent damage to the work, the mandrel should always be oiled before being forced into the hole. When turning work on a mandrel, feed toward the large end which should be nearest the headstock of the lathe.
A solid machine mandrel is generally made from hardened steel and ground to a slight taper of from 0.0005 to 0.0006 inch per inch. It has very accurately countersunk centers at each end for mounting between centers. The ends of the mandrel are smaller than the body and have machined flats for the lathe dog to grip. The size of the solid machine mandrel is always stamped on the large end of the taper. Since solid machine mandrels have a very slight taper, they are limited to workpieces with specific inside diameters.
An expansion mandrel will accept workpieces having a greater range of sizes. The expansion mandrel is, in effect, a chuck arranged so that the grips can be forced outward against the interior of the hole in the workpiece.
LATHE ATTACHMENTS
The variety of work that can be performed on the lathe is greatly increased by the use of various lathe attachments. Some lathes come equipped with special attachments; some attachments must be ordered separately. Some common lathe attachments are the steady rest with cathead, the follower rest, the tool post grinding machine, the lathe micrometer stop, the lathe milling fixture, the lathe coolant attachment, the lathe indexing fixture, and the milling-grinding-drilling-slotting attachment (or Versa-Mil). The lathe indexing fixture and Versa-Mil unit are detailed in Chapter 9. Descriptions for the other lathe attachments follows.
RESTS
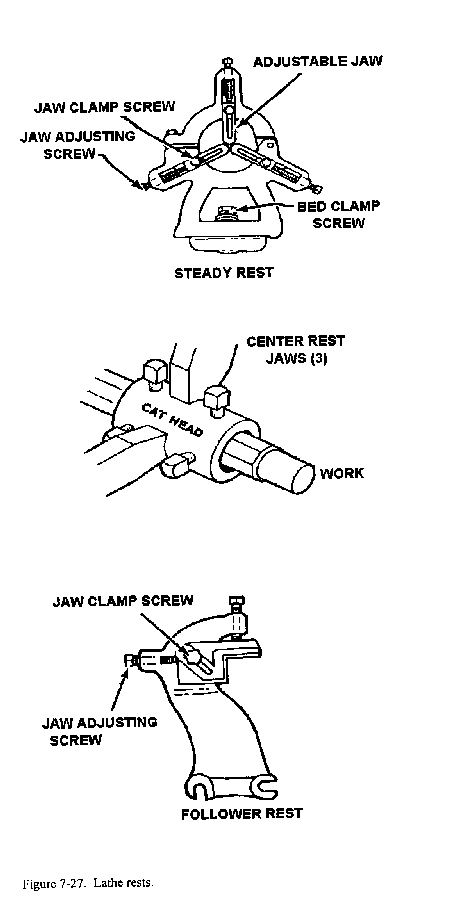
Workpieces often need extra support, especially long, thin workpieces that tend to spring away from the tool bit. Three common supports or rests are the steady rest, the cathead, and the follower rest (Figure 7-27).
Steady Rest
The steady rest, also called a center rest, is used to support long workpieces for turning and boring operations. It is also used for internal threading operations where the workpiece projects a considerable distance from the chuck or faceplate. The steady rest is clamped to the lathe bed at the desired location and supports the workpiece within three adjustable jaws. The workpiece must be machined with a concentric bearing surface at the point where the steady rest is to be applied. The jaws must be carefully adjusted for proper alignment and locked in position. The area of contact must be lubricated frequently. The top section of the steady rest swings away from the bottom section to permit removal of the workpiece without disturbing the jaw setting.
Cathead
When the work is too small to machine a bearing surface for the adjustable jaws to hold, then a cathead should be used. The cathead has a bearing surface, a hole through which the work extends, and adjusting screws. The adjusting screws fasten the cathead to the work. They are also used to align the bearing surface so that it is concentric to the work axis. A dial indicator must be used to set up the cathead to be concentric and accurate.
Follower Rest
The follower rest has one or two jaws that bear against the workpiece. The rest is fastened to the lathe carriage so that it will follow the tool bit and bear upon the portion of the workpiece that has just been turned. The cut must first be started and continued for a short longitudinal distance before the follower rest may be applied. The rest is generally used only for straight turning and for threading long, thin workpieces. Steady rests and follower rests can be equipped with ball-bearing surfaces on the adjustable jaws. These types of rests can be used without excessive lubricant or having to machine a polished bearing surface.
Micrometer Carriage Stop
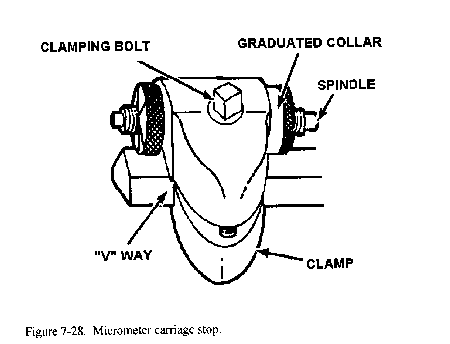
The micrometer carriage stop, Figure 7-28, is used to accurately position the lathe carriage. The micrometer stop is designed so the carriage can be moved into position against the retractable spindle of the stop and locked into place. A micrometer gage on the stop enables carriage movement of as little as 0.001 inch. This tool is very useful when facing work to length, turning a shoulder, or cutting an accurate groove.
Tool Post Grinder
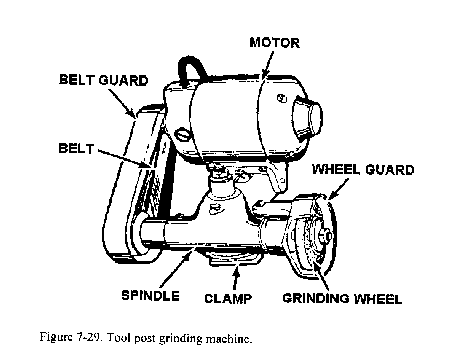
The tool post grinder (Figure 7-29) is a machine tool attachment specially designed for cylindrical grinding operations on the lathe. It consists primarily of a 1/4-or 1/3-horsepower electric motor and a wheel spindle connected by pulleys and a belt. The machine fastens to the compound rest of the lathe with a T-slot bolt which fits in the slot of the compound rest in the same manner as the lathe tool post. The tool post grinding machine mounts grinding abrasive wheels ranging from 1/4 inch to 3 or 4 inches in diameter for internal and external grinding operations. The pulleys on the wheel spindle and motor shaft are interchangeable to provide proper cutting speeds for the various wheel sizes. The larger grinding abrasive wheels used for external grinding are attached to the wheel spindle with an arbor. Small, mounted grinding abrasive wheels for internal grinding are fixed in a chuck which screws to the wheel spindle. The electric motor is connected to an electrical power source by a cable and plug. A switch is usually provided at the attachment to facilitate starting and stopping the motor.
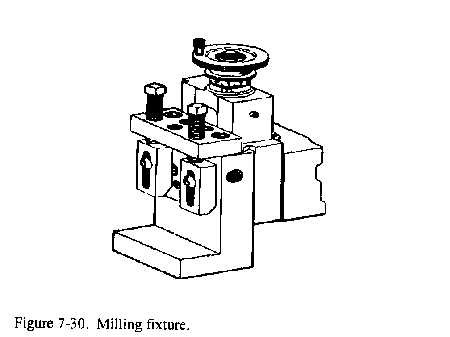
Lathe Milling Fixture
This is a fixture designed to provide the ability for limited milling operations. Many repair and fabrication jobs cannot be satisfactorily completed on the standard engine lathe, but with the lathe milling attachment, the small machine shop that is not equipped with a milling machine can mill keyslots, keyways, flats, angles, hex heads, squares, splines, and holes. For specific operating instructions and parts, refer to TM 9-3465-200-10.
TOOLS NECESSARY FOR LATHE WORK
In order to properly setup and operate most engine lathes, it is recommended to have the following tools on hand. A machinist tool box with all wrenches, screwdrivers, and common hand tools. A dial indicator may be necessary for some procedures on the lathe. References, charts, tables, and other predetermined data on machine operations may be useful to lathe operators. Keep all safety equipment, along with necessary cleaning marking, and lubricating equipment, in the immediate lathe area to use as needed.
CUTTING FLUIDS
The purposes of using cutting fluids on the lathe are to cool the tool bit and workpiece that are being machined, increase the life of the cutting tool, make a smoother surface finish, deter rust, and wash away chips. Cutting fluids can be sprayed, dripped, wiped, or flooded onto the point where the cutting action is taking place. Generally, cutting fluids should only be used if the speed or cutting action requires the use of cutting fluids. Descriptions of some common cutting fluids used on the lathe follow.
Lard Oil
Pure lard oil is one of the oldest and best cutting oils. It is especially good for thread cutting, tapping, deep hole drilling, and reaming. Lard oil has a high degree of adhesion or oiliness, a relatively high specific heat, and its fluidity changes only slightly with temperature. It is an excellent rust preventive and produces a smooth finish on the workpiece. Because lard oil is expensive, it is seldom used in a pure state but is combined with other ingredients to form good cutting oil mixtures.
Mineral Oil
Mineral oils are petroleum-base oils that range in viscosity from kerosene to light paraffin oils. Mineral oil is very stable and does not develop disagreeable odors like lard oil; however, it lacks some of the good qualities of lard oil such as adhesion, oiliness, and high specific heat. Because it is relatively inexpensive, it is commonly mixed with lard oil or other chemicals to provide cutting oils with desirable characteristics. Two mineral oils, kerosene and turpentine, are often used alone for machining aluminum and magnesium. Paraffin oil is used alone or with lard oil for machining copper and brass.
Mineral-Lard Cutting Oil Mixture
Various mixtures of mineral oils and lard oil are used to make cutting oils which combine the good points of both ingredients but prove more economical and often as effective as pure lard oil.
Sulfurized Fatty-Mineral Oil
Most good cutting oils contain mineral oil and lard oil with various amounts of sulfur and chlorine which give the oils good antiweld properties and promote free machining. These oils play an important part in present-day machining because they provide good finishes on most materials and aid the cutting of tough material.
Soluble Cutting Oils
Water is an excellent cooling medium but has little lubricating value and hastens rust and corrosion. Therefore, mineral oils or lard oils which can be mixed with water are often used to form a cutting oil. A soluble oil and water mix has lubricating qualities dependent upon the strength of the solution. Generally, soluble oil and water is used for rough cutting where quick dissipation of heat is most important. Borax and trisodium phosphate (TSP) are sometimes added to the solution to improve its corrosion resistance.
Soda-Water Mixtures
Salts such as soda ash and TSP are sometimes added to water to help control rust. This mixture is the cheapest of all coolants and has practically no lubricating value. Lard oil and soap in small quantities are sometimes added to the mixture to improve its lubricating qualities. Generally, soda water is used only where cooling is the prime consideration and lubrication a secondary consideration. It is especially suitable in reaming and threading operations on cast iron where a better finish is desired.
White Lead and Lard Oil Mixture
White lead can be mixed with either lard oil or mineral oil to form a cutting oil which is especially suitable for difficult machining of very hard metals.
LAYING OUT AND MOUNTING WORK
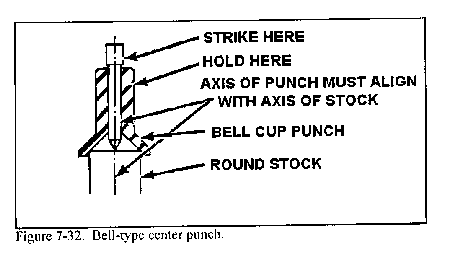
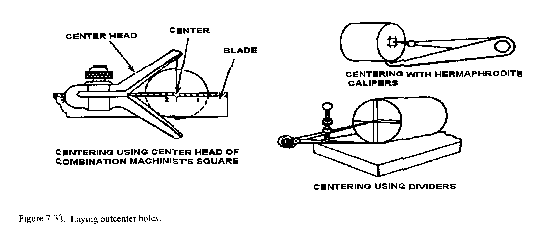
There is relatively little layout work to be done for most lathe work because of the lathe's ability to guide the cutting tool accurately to the workpiece. If center holes must be located and drilled into the end of a workpiece for turning lay out and center-punch the workpiece using other methods. Some suggested methods are to use a bell-type center punch between centers and this cannot be accomplished on the lathe, (Figure 7-32), use hermaphrodite calipers to scribe intersecting arcs, use the centering head of the combination square, or use dividers (Figure 7-33).
METHODS OF MOUNTING WORK
Mounting Workpieces in Chucks
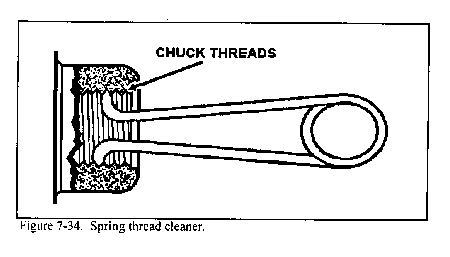
When installing the chuck or any attachment that screws onto the lathe headstock spindle, the threads and bearing surfaces of both spindle and chuck must be cleaned and oiled. In cleaning the internal threads of the chuck, a spring thread cleaner is very useful (Figure 7-34).
Turn the spindle so that the key is facing up and lock the spindle in position. Make sure that the spindle and chuck taper are free of grit and chips. Place the chuck in position on the spindle. Engage the draw nut thread and tighten by applying four or five hammer blows on the spanner wrench engaged with the draw nut. Rotate the spindle 180°, engage the spanner wrench, and give four or five solid hammer blows to the spanner wrench handle. The workpiece is now ready for mounting.
Work automatically centers itself in the universal (3 jaw) scroll chuck, drill chuck, collet chucks, and step chuck, but must be manually centered in the independent (4 jaw) chuck. To center work in the independent chuck, line the four jaws up to the concentric rings on the face of the chuck, as close to the required diameter as possible.
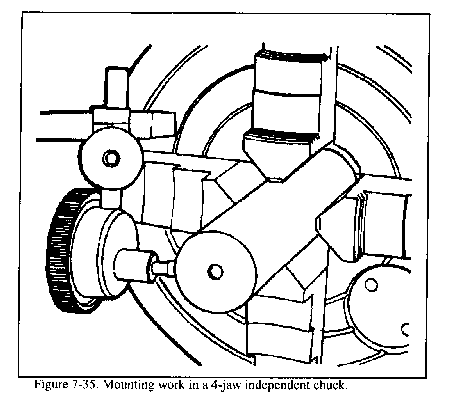
Mount the workpiece and tighten the jaws loosely onto the workpiece (Figure 7-35). Spin the workpiece by hand and make approximate centering adjustments as needed, then firmly tighten the jaws.
For rough centering irregularly shaped work, first measure the outside diameter of the workpiece, then open the four jaws of the chuck until the workpiece slides in. Next tighten each opposing jaw a little at a time until the workpiece is held firmly, but not too tightly. Hold a piece of chalk near the workpiece and revolve the chuck slowly with your left hand. Where the chalk touches is considered the high side.
Loosen the jaw opposite and tighten the jaw where the chalk marks are found. Repeat the process until the workpiece is satisfactorily aligned.
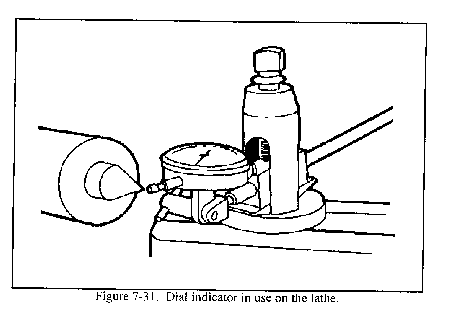
To center a workpiece having a smooth surface such as round stock, the best method is to use a dial test indicator. Place the point of the indicator against the outside or inside diameter of the workpiece. Revolve the workpiece slowly by hand and notice any deviations on the dial. This method will indicate any inaccuracy of the centering in thousandths of an inch.
If an irregularly shaped workpiece is to be mounted in the independent chuck, then a straight, hardened steel bar can be used with a dial indicator to align the workpiece. Experienced machinists fabricate several sizes of hardened steel bars, ground with a 60° point, that can be mounted into the drill chuck of the tailstock spindle and guided into the center-punched mark on the workpiece. A dial indicator can then be used to finish aligning the workpiece to within 0.001 inch. If a hardened steel bar is not readily available, a hardened center mounted in the tailstock spindle may be used to align the work while using a dial indicator on the chuck jaws. This method is one of several ways to align a workpiece in an independent chuck. Ingenuity and experience will increase the awareness of the machine operator to find the best method to set up the work for machining.
When removing chucks from the lathe, always use a wooden chuck block under the chuck to support the chuck on the lathe ways. Use care to avoid dropping the chuck on the ways, since this can greatly damage the lathe ways or crush the operator's hands.
Mounting Work to Faceplates
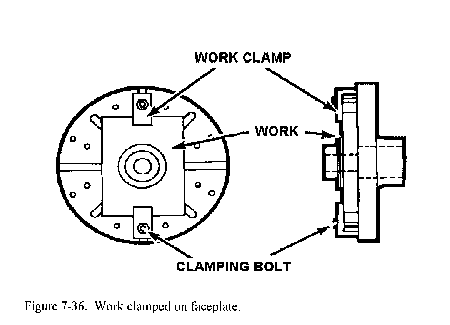
Mount faceplates in the same manner as chucks. Check the accuracy of the faceplate surface using a dial indicator, and true the-faceplate surface by taking a light cut if necessary. Do not use faceplates on different lathes, since this will cause excessive wear of the faceplate due to repeated truing cuts having to be taken. Mount the workpiece using T-bolts and clamps of the correct sizes (Figure 7-36 ). Ensure all surfaces are wiped clean of burrs, chips, and dirt. When a heavy piece of work is mounted off center, such as when using an angle plate, use a counterweight to offset the throw of the work and to minimize vibration and chatter. Use paper or brass shims between the work and the faceplate to protect the delicate surface of the faceplate. After mounting the work to an approximate center location, use a dial indicator to finish accurate alignment.
Mounting Work Between Centers
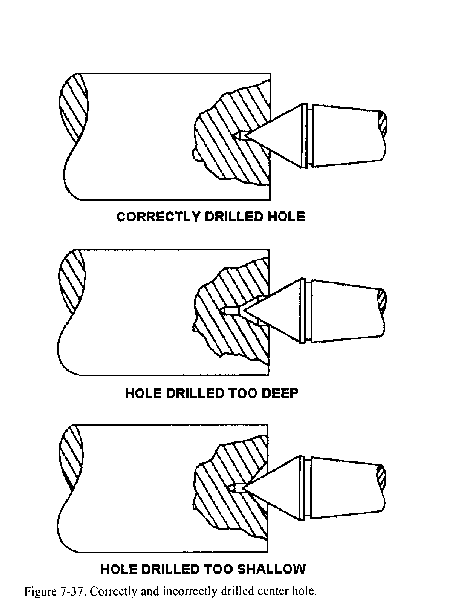
Before mounting a work-piece between centers, the workpiece ends must be center-drilled and countersunk. This can be done using a small twist drill followed by a 60° center countersink or, more commonly, using a countersink and drill (also commonly called a center drill). It is very important that the center holes are drilled and countersunk so that they will fit the lathe centers exactly. Incorrectly drilled holes will subject the lathe centers to unnecessary wear and the workpiece will not run true because of poor bearing surfaces. A correctly drilled and countersunk hole has a uniform 60° taper and has clearance at the bottom for the point of the lathe center. Figure 7-37 illustrates correctly and incorrectly drilled center holes. The holes should have a polished appearance so as not to score the lathe centers. The actual drilling and countersinking of center holes can be done on a drilling machine or on the lathe itself. Before attempting to center drill using the lathe, the end of the workpiece must be machined flat to keep the center drill from running off center.
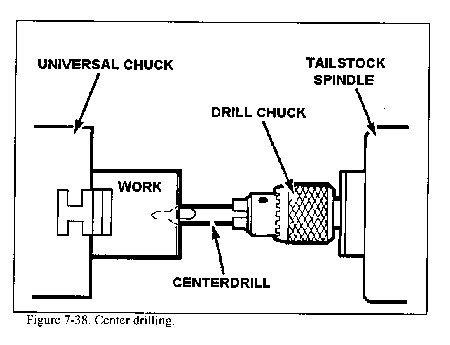
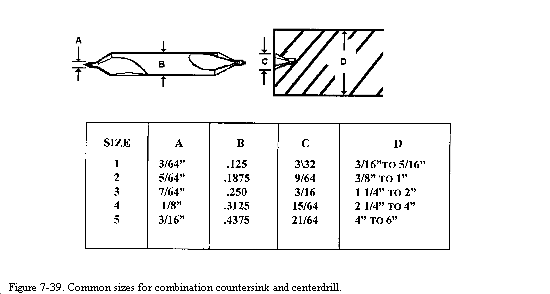
Mount the work in a universal or independent chuck and mount the center drill in the lathe tailstock (Figure 7-38). Refer to the section of this chapter on facing and drilling on the lathe, prior to doing this operation. Center drills come in various sizes for different diameters of work (Figure 7-39). Calculate the correct speed and hand feed into the workpiece. Only drill into the workpiece about 2/3 of the body diameter. high speeds and feed them into the work slowly to avoid breaking off the drill point inside the work. If this happens, the work must be removed from the chuck and the point extracted. This is a time-consuming job and could ruin the workpiece.
To mount work between centers, the operator must know how to insert and remove lathe centers. The quality of workmanship depends as much on the condition of the lathe centers as on the proper drilling of the center holes. Before mounting lathe centers in the headstock or tailstock, thoroughly clean the centers, the center sleeve, and the tapered sockets in the headstock and tailstock spindles. Any dirt or chips on the centers or in their sockets will prevent the centers from seating properly and will cause the centers to run out of true.
Install the lathe center in the tailstock spindle with a light twisting motion to ensure a clean fit. Install the center sleeve into the headstock spindle and install the lathe center into the center sleeve with a light twisting motion.
To remove the center from the headstock spindle, hold the pointed end with a cloth or rag in one hand and give the center a sharp tap with a rod or knockout bar inserted through the hollow headstock spindle.
To remove the center from the tailstock, turn the tailstock handwheel to draw the tailstock spindle into the tailstock. The center will contact the tailstock screw and will be bumped loose from its socket.
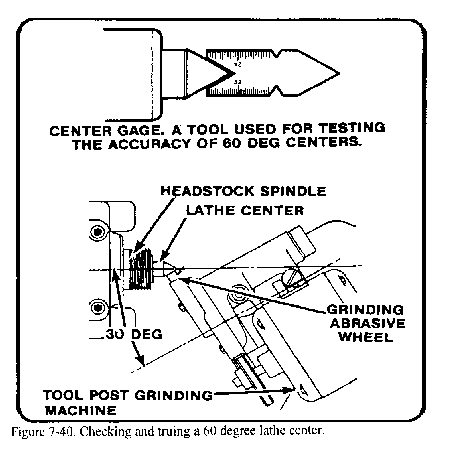
After mounting the headstock and tailstock centers, the accuracy of the 60° point should be checked using a center gage or a dial indicator. If the center in the headstock is not at 60°, or is scarred and burred, it must be trued while inserted in the lathe headstock spindle. If the headstock center is a soft center (a center that is not heat-treated and hardened), it can be turned true with the lathe tool bit. If the center in the headstock is hardened, it must be ground with a tool post grinding machine to get a true surface (Figure 7-40).
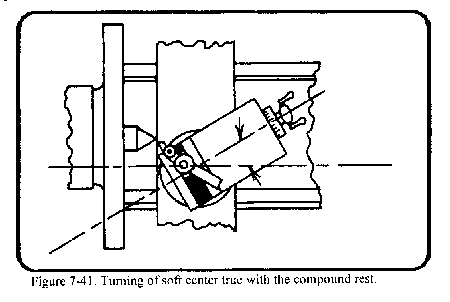
To turn a soft center true with the lathe, first set up the tool bit for right hand turning, center the tool bit; then, rotate the compound rest to an angle of 30° to the axis of the lathe (Figure 7-41). The lathe speed should be set for a finish cut, and the feed is supplied by cranking the handwheel of the compound rest, thus producing a clean and short steep taper with an included angle of 60°. Once trued, the center should stay in place until the operation is completed. If the center must be removed, mark the position on the center and headstock for easy realignment later.
Lathe centers must be parallel with the ways of the lathe in order to turn workpieces straight and true. Before beginning each turning operation, the center alignment should be checked.
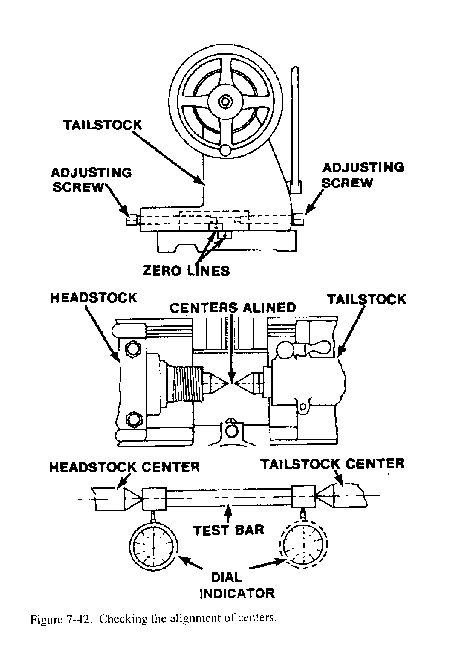
The tailstock may be moved laterally to accomplish this alignment by means of adjusting screws after it has been released from the ways. Two zero lines are located at the rear of the tailstock and the centers are approximately aligned when these lines coincide (Figure 7-42). This alignment may be checked by moving the tailstock up close to the headstock so that the centers almost touch, and observing their relative positions (Figure 7-42).
The most accurate method of checking alignment of centers is by mounting the workpiece between centers and taking light cuts at both ends without changing the carriage adjustments. Measure each end of this cut with calipers or a micrometer. If the tailstock end is greater in diameter than the headstock end, the tailstock is moved toward the operator. If the tailstock end is smaller in diameter than the headstock end, the tailstock is moved away from the operator. Take additional cuts in the same manner after each adjustment until both cuts measure the same.
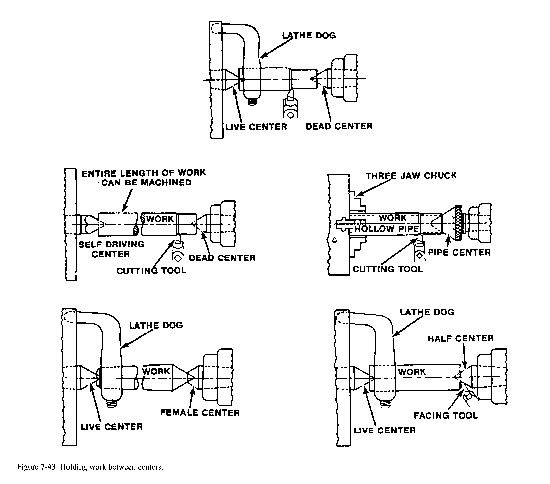
To setup the workpiece between centers on the lathe, a driving faceplate (drive plate) and lathe dog must be used.
(Figure 7-43). Make headstock spindle are faceplate. Screw the sure that the external threads of the clean before screwing on the driving faceplate securely onto the spindle. Clamp the lathe dog on the workpiece so that its tail hangs over the end of the workpiece. If the workpiece is finished, place a shim of soft material such as brass between the setscrew of the dog and workpiece. Mount the workpiece between the centers. Make sure that the lathe dog tail tits freely in the slot of the faceplate and does not bind. Sometimes, the tailstock center is a dead center and does not revolve with the workpiece, so it may require lubrication. A few drops of oil mixed with white lead should be applied to the center before the workpiece is set up. The tailstock should be adjusted so that the tailstock center fits firmly into the center hole of the workpiece but does not bind. The lathe should be stopped at intervals and additional oil and white lead mixture applied to the dead center to prevent overheating harm to the center and the workpiece.
Mounting Work on Mandrels
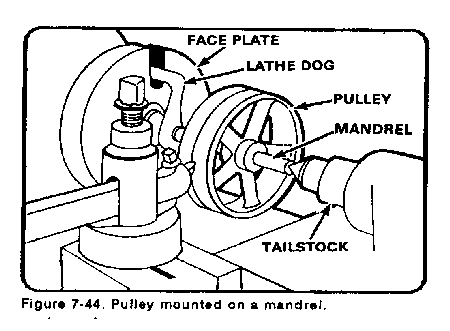
To machine a workpiece of an odd shape, such as a wheel pulley, a tapered mandrel is used to hold and turn the work. The mandrel must be mounted between centers and a drive plate and lathe dog must be used. The centers must be aligned and the mandrel must be free of burrs. Mount the workpiece onto a lubricated mandrel of the proper size by using an arbor press. Ensure that the lathe dog is secured to the machined flat on the end of the mandrel and not on the smooth surface of the mandrel taper (Figure 7-44). If expansion bushings are to be used with a mandrel, clean and care for the expansion bushings in the same manner as a normal mandrel.
Always feed the tool bit in the direction of the large end of the mandrel, which is usually toward the headstock end, to avoid pulling the work out of the mandrel. If facing on a mandrel, avoid cutting into the mandrel with the tool bit..
GENERAL LATHE OPERATIONS
LATHE SPEEDS, FEEDS, AND DEPTH OF CUTS
General operations on the lathe include straight and shoulder turning, facing, grooving, parting, turning tapers, and cutting various screw threads. Before these operations can be done, a thorough knowledge of the variable factors of lathe speeds, feeds, and depth of cut must be understood. These factors differ for each lathe operation, and failure to use these factors properly will result in machine failure or work damage. The kind of material being worked, the type of tool bit, the diameter and length of the workpiece, the type of cut desired (roughing or finishing), and the working condition of the lathe will determine which speed, feed, or depth of cut is best for any particular operation. The guidelines which follow for selecting speed, feed, and depth of cut are general in nature and may need to be changed as conditions dictate.
Cutting Speeds.
The cutting speed of a tool bit is defined as the number of feet of workpiece surface, measured at the circumference, that passes the tool bit in one minute. The cutting speed, expressed in FPM, must not be confused with the spindle speed of the lathe which is expressed in RPM. To obtain uniform cutting speed, the lathe spindle must be revolved faster for workpieces of small diameter and slower for workpieces of large diameter. The proper cutting speed for a given job depends upon the hardness of the material being machined, the material of the tool bit, and how much feed and depth of cut is required. Cutting speeds for metal are usually expressed in surface feet per minute, measured on the circumference of the work. Spindle revolutions per minute (RPM) are determined by using the formula:
![]()
Which is simplified to:
![]()
Where SFM is the rated surface feet per minute, also expressed as cutting speed.
RPM is the spindle speed in revolutions per minute
D is the diameter of the work in inches.
In order to use the formula simply insert the cutting speed of the metal and the diameter of the workpiece into the formula and you will have the RPM.
Turning a one-half inch piece of aluminum, cutting speed of 200 SFM, would result in the following:

Machinist Table 7-2 lists specific ranges of cutting speeds for turning and threading various materials under normal lathe conditions, using normal feeds and depth of cuts. Note that in Table 7-2 the measurement calculations are in inch and metric measures. The diameter measurements used in these calculations are the actual working diameters that are being machined, and not necessarily the largest diameter of the material. The cutting speeds have a wide range so that the lower end of the cutting speed range can be used for rough cutting and the higher end for finish cutting. If no cutting speed tables are available, remember that, generally, hard materials require a slower cutting speed than soft or ductile materials. Materials that are machined dry, without coolant, require a slower cutting speed than operations using coolant. Lathes that are worn and in poor condition will require slower speeds than machines that are in good shape. If carbide-tipped tool bits are being used, speeds can be increased two to three times the speed used for high-speed tool bits.
Feed
Feed is the term applied to the distance the tool bit advances along the work for each revolution of the lathe spindle. Feed is measured in inches or millimeters per revolution, depending on the lathe used and the operator's system of measurement. Machinist Table 7-3 is a guide that can be used to select feed for general roughing and finishing operations. A light feed must be used on slender and small workpieces to avoid damage. If an irregular finish or chatter marks develop while turning, reduce the feed and check the tool bit for alignment and sharpness. Regardless of how the work is held in the lathe, the tool should feed toward the headstock. This results in most of the pressure of the cut being put on the work holding device. If the cut must be fed toward the tailstock, use light feeds and light cuts to avoid pulling the workpiece loose.
Depth of Cut
Depth of cut is the distance that the tool bit moves into the work, usually measured in thousandths of an inch or in millimeters. General machine practice is to use a depth of cut up to five times the rate of feed, such as rough cutting stainless steel using a feed of 0.020 inch per revolution and a depth of cut of 0.100 inch, which would reduce the diameter by 0.200 inch. If chatter marks or machine noise develops, reduce the depth of cut.
MICROMETER COLLAR
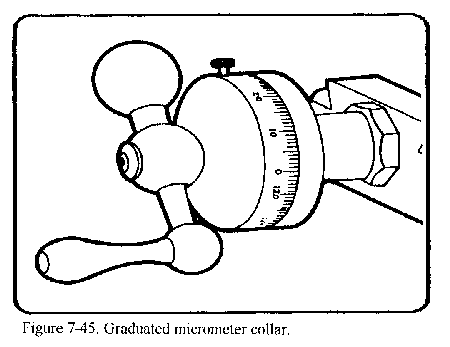
Graduated micrometer collars can be used to accurately measure this tool bit movement to and away from the lathe center axis. Thus, the depth of cut can be accurately measured when moving the tool bit on the cross slide by using the cross slide micrometer collar. The compound rest is also equipped with a micrometer collar. These collars can measure in inches or in millimeters, or they can be equipped with a dual readout collar that has both. Some collars measure the exact tool bit movement, while others are designed to measure the amount of material removed from the workpiece (twice the tool bit movement). Consult the operator's instruction manual for specific information on graduated collar use.
FACING
Facing is machining the ends and shoulders of a piece of stock smooth, flat, and perpendicular to the lathe axis. Facing is used to cut work to the desired length and to produce a surface from which accurate measurements may be taken.
Facing Work in a Chuck
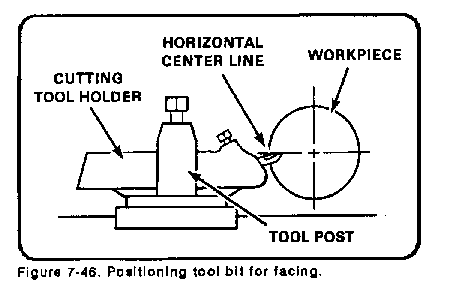
Facing is usually performed with the work held in a chuck or collet. Allow the workpiece to extend a distance no more than 1 1/2 times the work diameter from the chuck jaws, and use finishing speeds and feeds calculated using the largest diameter of the workpiece. The tool bit may be fed from the outer edge to the center or from the center to the outer edge. Normal facing is done from the outer edge to the center since this method permits the operator to observe the tool bit and layout line while starting the cut. This method also eliminates the problem of feeding the tool bit into the solid center portion of the workpiece to get a cut started.. Use a left-hand finishing tool bit and a right-hand tool holder when facing from the outer edge toward the center. Work that has a drilled or bored hole in the center may be faced from the center out to the outer edge if a right-hand finishing tool bit is used. Avoid excessive tool holder and tool bit overhang when setting up the facing operation. Set the tool bit exactly on center to avoid leaving a center nub on the workpiece (Figure 7-46 ). Use the tailstock center point as a reference point when setting the tool bit exactly on center. If no tailstock center is available, take a trial cut and readjust as needed. If using the cross slide power feed to move the tool bit (into the center), disengage power when the tool bit is within l/16 inch of the center and finish the facing cut using hand feed.
Facing Work Between Centers
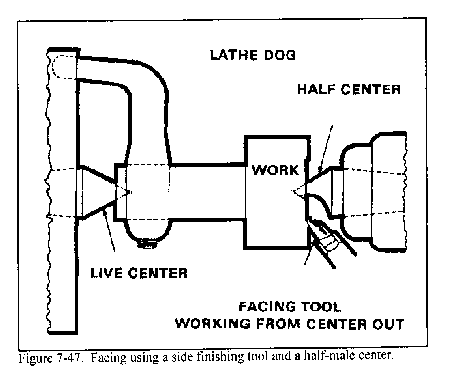
Sometimes the workpiece will not fit into a chuck or collet, so facing must be done between centers. To properly accomplish facing between centers, the workpiece must be center-drilled before mounting into the lathe. A half male center (with the tip well lubricated with a white lead and oil mixture) must be used in the lathe tailstock to provide adequate clearance for the tool bit. The tool bit must be ground with a sharp angle to permit facing to the very edge of the center drilled hole (Figure 7-47). Start the facing cut at the edge of the center-drilled hole after checking for tool bit clearance, and feed the cutting tool out to the edge. Use light cuts and finishing feeds, which will reduce the tension put on the half male center. Replace the half male center with a standard center after the facing operation, since the half male center will not provide adequate support for general turning operations. Only a small amount of material can be removed while facing between centers. If too much material is removed, the center-drilled hole will become too small to support the workpiece.
Precision Facing
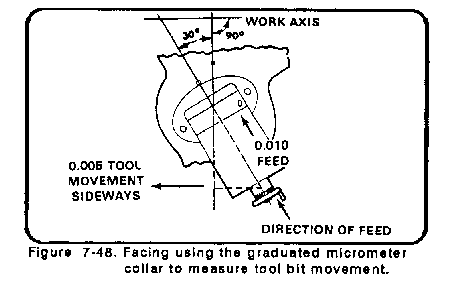
Special methods must be used to face materials to a precise length. One method is to mount the work in a chuck and lightly face one end with a cleanup cut. Then, reverse the stock and face it to the scribed layout line. This method may not be as accurate as other methods, but it will work for most jobs. A more precise method to face a piece of stock to a specified length is to turn the compound rest to an angle of 30 degrees to the cross slide and then use the graduated micrometer collar to measure tool bit movement, Figure 7-48. At this angle of the compound rest, the movement of the cutting tool will always be half of the reading of the graduated collar. Thus, if the compound rest feed is turned 0.010 inch, the tool bit will face off 0.005 inch of material. With the compound rest angled at 30°, a light cut may be made on the first end, then the piece reversed and faced to accurate length. Always lock the carriage down to the bed. This provides the most secure and accurate base for the cutting tool and helps eliminate unwanted vibration during facing operations. Another way to face to a precise length is to use the lathe carriage micrometer stop to measure the carriage and tool bit movement. Using the micrometer stop can sometimes be faster and easier than using the compound rest graduated collar for measuring tool bit movement.
STRAIGHT TURNING
Straight turning, sometimes called cylindrical turning, is the process of reducing the work diameter to a specific dimension as the carriage moves the tool along the work. The work is machined on a plane parallel to its axis so that there is no variation in the work diameter throughout the length of the cut. Straight turning usually consists of a roughing cut followed by a finishing cut. When a large amount of material is to be removed, several roughing cuts may need to be taken. The roughing cut should be as heavy as the machine and tool bit can withstand. The finishing cut should be light and made to cut to the specified dimension in just one pass of the tool bit. When using power feed to machine to a specific length, always disengage the feed approximately 1/16-inch away from the desired length dimension, and then finish the cut using hand feed.
Setting Depth of Cut
In straight turning, the cross feed or compound rest graduated collars are used to determine the depth of cut, which will remove a desired amount from the workpiece diameter. When using the graduated collars for measurement, make all readings when rotating the handles in the forward direction. The lost motion in the gears, called backlash, prevents taking accurate readings when the feed is reversed. If the feed screw must be reversed, such as to restart a cut, then the backlash must be taken up by turning the feed screw handle in the opposite direction until the movement of the screw actuates the movement of the cross slide or compound rest. Then turn the feed screw handle in the original or desired direction back to the required setting.
Setting Tool Bit for Straight Turning
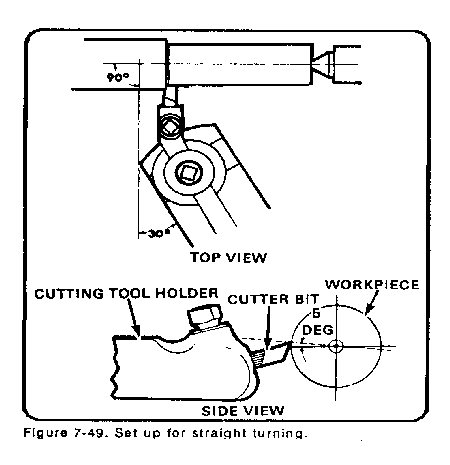
See Figure 7-49. For most straight turning operations, the compound rest should be aligned at an angle perpendicular to the cross slide, and then swung 30° to the right and clamped in position. The tool post should be set on the left-hand side of the compound rest T-slot, with a minimum of tool bit and tool holder overhang.
When the compound rest and tool post are in these positions, the danger of running the cutting tool into the chuck or damaging the cross slide are minimized. Position the roughing tool bit about 5° above center height for the best cutting action. This is approximately 3/64-inch above center for each inch of the workpiece diameter. The finishing tool bit should be positioned at center height since there is less torque during finishing. The position of the tool bit to the work should be set so that if anything occurs during the cutting process to change the tool bit alignment, the tool bit will not dig into the work, but instead will move away from the work. Also, by setting the tool bit in this position, chatter will be reduced. Use a right-hand turning tool bit with a slight round radius on the nose for straight turning. Always feed the tool bit toward the headstock unless turning up to an inside shoulder. Different workpieces can be mounted in a chuck, in a collet, or between centers. Which work holding device to use will depend on the size of the work and the particular operation that needs to be performed.
Turning Work Between Centers
Turning work that is held between centers is one accurate method that is available. The chief advantage of using this method is that the work can be removed from the lathe and later replaced for subsequent machining operations without disturbing the trueness of the turned surface in relation to the center holes of the workpiece. The lathe centers must be in good condition and carefully aligned if the turning operation is to be accurate. If necessary, true the centers and realign as needed. After the workpiece is center-drilled, place a lathe dog (that is slightly larger in diameter than the workpiece) on the end of the work that will be toward the headstock, and tighten the lathe dog bolt securely to the workpiece). If using a dead center in the tailstock, lubricate the center with a mixture of white lead and motor oil. A ball bearing live center is best for the tailstock center since this center would not need lubrication and can properly support the work. Extend the tailstock spindle out about 3 inches and loosen the tailstock clamp-down nut. Place the work with the lathe dog end on the headstock live center and slide the tailstock forward until the tailstock center will support the work; then, secure the tailstock with the clamp-down nut. Adjust the tail of the lathe dog in the drive plate slot, making sure that the tail does not bind into the slot and force the work out of the center. A good fit for the lathe dog is when there is clearance at the top and bottom of the drive plate slot on both sides of the lathe dog tail. Tension should be applied to hold the work in place, but not so much tension that the tail of the lathe dog will not move freely in the drive -plate slot.
Check tool bit clearance by moving the tool bit to the furthest position that can be cut without running into the lathe dog or the drive plate. Set the lathe carriage stop or micrometer carriage stop at this point to reference for the end of the cut and to protect the lathe components from damage. Set the speed, feed, and depth of cut for a roughing cut and then rough cut to within 0.020 inch of the final dimension. Perform a finish cut, flip the piece over, and change the lathe dog to the opposite end. Then rough and finish cut the second side to final dimensions.
Turning Work in Chucks
Some work can be machined more efficiently by using chucks, collets, mandrels, or faceplates to hold the work. Rough and finish turning using these devices is basically the same as for turning between centers. The workpiece should not extend too far from the work holding device without adequate support. If the work extends more than three times the diameter of the workpiece from the chuck or collet, additional support must be used such as a steady rest or a tailstock center support. When turning using a mandrel or faceplate to hold an odd-shaped workpiece, use light cuts and always feed the cutting tool toward the headstock. Every job may require a different setup and a different level of skill. Through experience, each machine operator will learn the best methods for holding work to be turned.
MACHINING SHOULDERS, CORNERS, UNDERCUTS, GROOVES, AND PARTING
Shoulders
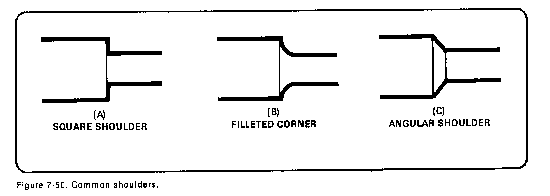
Frequently, it will be necessary to machine work that has two or more diameters in its length. The abrupt step, or meeting place, of the two diameters is called a shoulder. The workpiece may be mounted in a chuck, collet, or mandrel, or between centers as in straight turning. Shoulders are turned, or formed, to various shapes to suit the requirements of a particular part. Shoulders are machined to add strength for parts that are to be fitted together, make a corner, or improve the appearance of a part. The three common shoulders are the square, the filleted, and the angular shoulder (Figure 7-50).
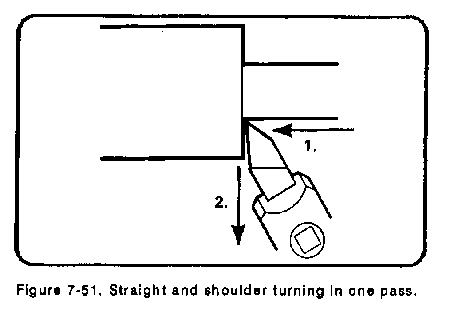
Square shoulders are used on work that is not subject to excessive strain at the corners. This shape provides a flat clamping surface and permits parts to be fitted squarely together. There are many different ways to accurately machine a square shoulder. One method is to use a parting tool bit to locate and cut to depth the position of the shoulder. Straight-turning the diameter down to the desired size is then the same as normal straight turning. Another method to machine a square shoulder is to rough out the shoulder slightly oversize with a round-nosed tool bit, and then finish square the shoulders to size with a side-finishing tool bit. Both of these methods are fine for most work, but may be too time-consuming for precise jobs. Shoulders can be machined quickly and accurately by using one type of tool bit that is ground and angled to straight turn and face in one operation (Figure 7-51).
Set up the micrometer carriage stop to align the shoulder dimension; then, in one pass of the tool bit, feed the tool bit left to turn the smaller diameter until contact is made with the carriage stop. Change the direction to feed out from center and face the shoulder out to the edge of the workpiece. The lathe micrometer stop measures the length of the shoulder and provides for a stop or reference for the tool bit. Shoulder turning in this manner can be accomplished with a few roughing cuts and a finishing cut.
Filleted Shoulders
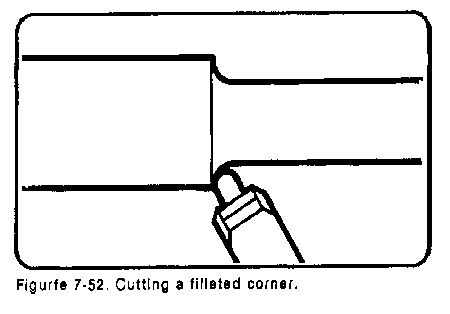
Filleted shoulders or corners, are rounded to be used on parts which require additional strength at the shoulder. These shoulders are machined with a round-nose tool bit or a specially formed tool bit (Figure 7-52). This type of shoulder can be turned and formed in the same manner as square shoulders. Filleted corners are commonly cut to double-sided shoulders (see Undercuts).
Angular Shoulders
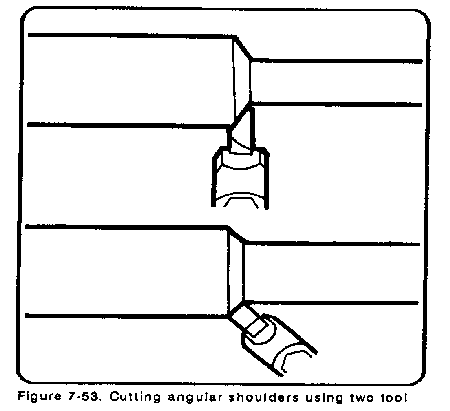
Angular shoulders although not as common as filleted shoulders, are sometimes used to give additional strength to corners, to eliminate sharp corners, and to add to the appearance of the work. Angular shoulders do not have all the strength of filleted corners but are more economical to produce due to the simpler cutting tools. These shoulders are turned in the same manner as square shoulders by using a side turning tool set at the desired angle of the shoulder, or with a square-nosed tool set straight into the work (Figure 7-53).
Corners
Corners are turned on the edges of work to break down sharp edges and to add to the general appearance of the work. Common types of corners are chamfered, rounded, and square (Figure 7-54). Chamfered (or angular) corners may be turned with the side of a turning tool or the end of a square tool bit, as in angular shoulder turning. Round corners are produced by turning a small radius on the ends of the work. The radius may be formed by hand manipulation of the cross slide and carriage using a turning tool. An easier method is to use a tool bit specifically ground for the shape of the desired corner. Still another method is to file the radius with a standard file. A square corner is simply what is left when making a shoulder, and no machining is needed.
Undercuts are the reductions in diameter machined onto the center portion of workpieces (Figure 7-55) to lighten the piece or to reduce an area of the part for special reasons, such as holding an oil seal ring. Some tools, such as drills and reamers, require a reduction in diameter at the ends of the flutes to provide clearance or runout for a milling cutter or grinding wheel. Reducing the diameter of a shaft or workpiece at the center with filleted shoulders at each end may be accomplished by the use of a round-nosed turning tool bit. This tool bit may or may not have a side rake angle, depending on how much machining needs to be done. A tool bit without any side rake is best when machining in either direction. Undercutting is done by feeding the tool bit into the workpiece while moving the carriage back and forth slightly. This prevents gouging and chatter occurring on the work surface.
Grooves
Grooving (or necking) is the process of turning a groove or furrow on a cylinder, shaft, or workpiece. The shape of the tool and the depth to which it is fed into the work govern the shape and size of the groove. The types of grooves most commonly used are square, round, and V-shaped (Figure 7-56). Square and round grooves are frequently cut on work to provide a space for tool runout during subsequent machining operations, such as threading or knurling. These grooves also provide a clearance for assembly of different parts. The V-shaped groove is used extensively on step pulleys made to fit a V-type belt. The grooving tool is a type of forming tool. It is ground without side or back rake angles and set to the work at center height with a minimum of overhang. The side and end relief angles are generally somewhat less than for turning tools.
In order to cut a round groove of a definite radius on a cylindrical surface, the tool bit must be ground to fit the proper radius gage (Figure 7-57). Small V-grooves may be machined by using a form tool ground to size or just slightly undersize. Large V-grooves may be machined with the compound rest by finishing each side separately at the desired angle. This method reduces tool bit and work contact area, thus reducing chatter, gouging, and tearing. Since the cutting surface of the tool bit is generally broad, the cutting speed must be slower than that used for general turning. A good guide is to use half of the speed recommended for normal turning. The depth of the groove, or the diameter of the undercut, may be checked by using outside calipers or by using two wires and an outside micrometer (Figure 7-58).
When a micrometer and two wires are used, the micrometer reading is equal to the measured diameter of the groove plus two wire diameters.
To calculate measurement over the wires, use the following formula:
Measurement = Outside Diameter + (2 x wires) - 2 x radius).
Click for PAGE 3 of 3 - Machinist Tables
Click for the American Machine Tool Homepage
Click to see our JET Lathes
Click to see our Chinese Lathes
American
Machine Tools Corp.
5862 Northwest Hwy
Chicago IL 60631 USA
Phone: 773-334-5000
Fax: 773-442-0314
Click
to email us
Copyright © 2001-2024
American Machine Tools Co.
All rights reserved
Offers from American Machine Tools Corporation include include Terms and Conditions shown on our website.
Liability is strictly limited to those warranties of fitness for purpose and safety as provided by the manufacturer.
Products and Logos in this website are trademarks or registered trademarks of their respective companies or mark holders.


